Pregnancy Safe Chocolate Mousse
- Time: Active 15 minutes, Passive 2 hours, Total 2 hours 15 mins
- Flavor/Texture Hook: Intensely chocolatey with a velvety, melt on-the tongue finish
- Perfect for: Pregnancy safe cravings, dinner parties, or iron rich cocoa boosts
- Safe and Velvety Chocolate Mousse for Cravings
- The Science of Fat Based Aeration
- Selecting high-quality Nutrient Dense Components
- Wholesome Ingredients and Smart Substitutes
- Essential Tools for Achieving Silkiness
- Simple Steps for Perfect Integration
- Preventing Grainy or Flat Results
- Adjusting Batch Sizes for Any Need
- Flavor Twists and Dietary Adaptations
- Storage Tips for Lasting Freshness
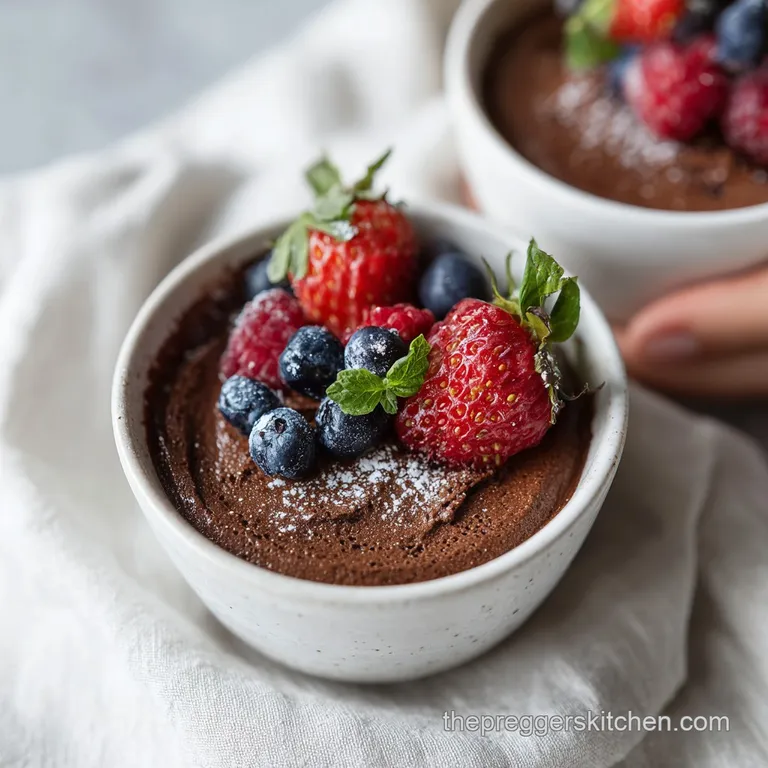
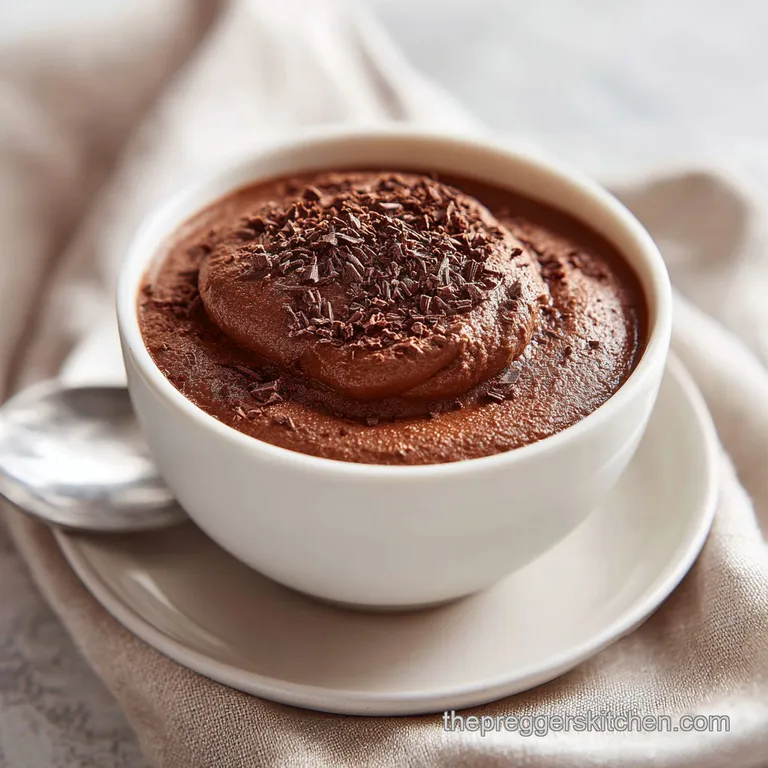
- Elegant Ways to Present Mousse
- Recipe FAQs
- 📝 Recipe Card
Safe and Velvety Chocolate Mousse for Cravings
Honestly, the first time I tried making a pregnancy safe chocolate mousse, I ended up with a bowl of grainy, chocolate flecked soup. I was craving that specific, airy "shatter" of a classic French mousse but couldn't risk the traditional raw egg yolks. It was a total kitchen heartbreak.
After three batches of testing, I realized the secret isn't in adding more thickeners it’s all about the temperature of your chocolate and the "stiffness" of your cream.
This version is the one I make when I need a nutrient dense hit of magnesium and iron without any of the fuss. We're skipping the gelatin and the eggs entirely. Instead, we’re using high-quality dark chocolate and a specific folding technique that traps air bubbles inside a chilled fat structure.
It feels fancy, but you can basically whip this up while your tea is steeping.
We’re going for a texture that is dense enough to hold a spoon but light enough to vanish the moment it hits your tongue. Since we're looking at this through a wellness lens, using 60-70% cocoa gives us those wholesome antioxidants while keeping the sugar spike in check.
Trust me, once you nail the temperature bridge between the warm chocolate and cold cream, you’ll never go back to the egg heavy versions.
The Science of Fat Based Aeration
Lipid Stabilization: Chilled heavy cream contains fat globules that, when whipped, form a structural network that traps air without needing egg protein.
Thermal Emulsification: Adding a small amount of warm milk to the chocolate creates a ganache, which prevents the chocolate from "shocking" and turning grainy when hitting the cold cream.
Crystal Structure: Cocoa butter in dark chocolate hardens as it cools, providing the "set" that allows the mousse to hold its shape.
| Servings | Chocolate Quantity | Cream Quantity | Suggested Vessel |
|---|---|---|---|
| 2 People | 2.5 oz (70g) | 1/2 cup (120ml) | Small Ramekins |
| 4 People | 5 oz (140g) | 1 cup (240ml) | 4 Martini Glasses |
| 8 People | 10 oz (280g) | 2 cups (480ml) | Large Trifle Bowl |
Selecting high-quality Nutrient Dense Components
When you're making something with so few ingredients, the quality of each one carries the weight of the whole dish. For the best result, look for chocolate that lists cocoa butter as a primary fat rather than vegetable oils. This ensures that the mousse sets with a clean "snap" rather than a greasy film.
I usually reach for a 70% dark bar it’s iron rich and provides a deep, complex flavor that balances the sweetness of the powdered sugar. If you're looking for more ways to satisfy a sweet tooth while staying mindful of nutrition, my Magnesium Rich Dark recipe is another great way to use these high cocoa bars.
| Ingredient | Science Role | Pro Secret |
|---|---|---|
| Dark Chocolate (5 oz) | Structural Base | Use bars, not chips; chips have stabilizers that prevent a silky melt. |
| Heavy Cream (1 cup) | Aeration Matrix | Ensure it is minimum 36% fat and "cold from the fridge" to hold air bubbles. |
| Sea Salt (1 pinch) | Flavor Catalyst | Salt suppresses bitterness and makes the chocolate "pop" on the palate. |
Wholesome Ingredients and Smart Substitutes
- 5 oz high-quality dark chocolate (60-70% cocoa): Chopped finely. Why this? Dark chocolate provides iron and magnesium for prenatal support.
- 2 tbsp whole milk: Slightly warmed. Why this? It thins the chocolate just enough to fold into the cream.
- 1 tsp pure vanilla extract: For depth.
- 1 pinch sea salt: To balance.
- 1 cup heavy whipping cream: Must be chilled. Why this? Cold fat is the only thing providing structure here.
- 2 tbsp powdered sugar: Sifted. Why this? Dissolves instantly without adding any "grittiness."
| Original Ingredient | Substitute | Why It Works |
|---|---|---|
| Whole Milk | Coconut Milk (full fat) | Similar fat profile; adds a subtle tropical note. |
| Powdered Sugar | Maple Syrup (Grade A) | Natural sweetener. Note: May result in a slightly softer set. |
| Dark Chocolate | Semi Sweet Chocolate | Sweeter profile. Note: Reduce powdered sugar to 1 tbsp. |
Essential Tools for Achieving Silkiness
You don't need a professional kitchen, but a few specific tools make this "fail proof." A glass or metal bowl is better for whipping cream than plastic, as plastic can hold onto microscopic fat residues that prevent the cream from reaching stiff peaks.
- Heat proof bowl: For melting chocolate over a simmer (bain marie).
- Hand mixer or whisk: A stand mixer such as a KitchenAid works great for larger batches.
- Silicone spatula: Vital for the "J fold" technique to keep the air in.
- Fine mesh sieve: If you decide to top with cocoa powder later.
Simple Steps for Perfect Integration
- Chop chocolate. Break the 5 oz dark chocolate into uniform, pea sized pieces to ensure even melting without scorching.
- Melt gently. Place chocolate and 2 tbsp milk in a bowl over simmering water. Note: Don't let the bowl touch the water, or the chocolate might seize.
- Flavor base. Stir in the vanilla and sea salt until the mixture is glossy and smooth.
- Cool slightly. Remove from heat and let sit for 3-5 minutes. It should feel warm (roughly 45°C), not hot, to the touch.
- Whip cream. In a separate chilled bowl, beat the 1 cup heavy cream and 2 tbsp powdered sugar.
- Peak check. Beat until you achieve stiff peaks that stand straight up when you lift the beaters.
- Temper the base. Add a small dollop (about 2 tbsp) of the whipped cream to the chocolate. Stir vigorously to lighten the chocolate.
- Fold gently. Pour the chocolate mixture into the remaining whipped cream. Use a "J fold" (down the middle, across the bottom, and over) about 12-15 times.
- Stop mixing. Stop as soon as no white streaks remain until the color is uniform and velvety.
- Chill well. Spoon into glasses and refrigerate for at least 2 hours until firm.
Preventing Grainy or Flat Results
The biggest mistake is the temperature gap. If your chocolate is too hot, it melts the fat in the cream, leaving you with a liquid mess. If it's too cold, it will solidify into tiny "pebbles" the moment it hits the cold cream, creating a gritty texture.
Why Your Mousse Is Gritty
This usually happens because the chocolate cooled down too much before the cream was added. The cocoa butter "shattered" into tiny crystals. To fix this next time, ensure your chocolate base is fluid and slightly above room temperature before the first fold.
Why Your Mousse Is Runny
This is a sign of under whipped cream or over folding. If you fold too many times, you deflate the air bubbles you worked so hard to create. If it's already runny, you can't really "re whip" it, but it makes an excellent "chocolate cream" topping for our Healthy Oatmeal Cookies recipe.
| Problem | Root Cause | Solution |
|---|---|---|
| Seized Chocolate | Water droplet in bowl | Add 1 tsp of warm milk and stir vigorously to restore. |
| Flat Texture | Over folding | Fold only until the streaks disappear; do not stir. |
| Grainy Bits | Chocolate too cold | Temper the chocolate with a small amount of cream first. |
Common Mistakes Checklist
- ✓ Ensure the mixing bowl for the cream is bone dry and cold.
- ✓ Use a bar of chocolate rather than chocolate chips for better melting.
- ✓ Sift your powdered sugar to avoid tiny white lumps in the dark mousse.
- ✓ Don't walk away while melting chocolate; it can burn in seconds.
- ✓ Allow at least 2 hours of chill time patience is the final ingredient!
Adjusting Batch Sizes for Any Need
Scaling this recipe is straightforward because it relies on a simple ratio of chocolate to cream. If you are doubling the recipe for a party, work in two separate bowls for the whipping stage to ensure you get consistent aeration.
- Scaling Up (2x): Use 10 oz chocolate and 2 cups cream. Keep the vanilla and salt at 1.5x to avoid overpowering the cocoa.
- Scaling Down (1/2): Use 2.5 oz chocolate and 1/2 cup cream. This is the perfect "midnight snack" size for two small ramekins.
- Baking Note: If you plan to use this as a cake filling, whip the cream slightly further (just past stiff peaks) to ensure it can hold the weight of the sponge.
Flavor Twists and Dietary Adaptations
While the classic version is iconic, you can easily shift the profile. If you're looking for a fudgier, denser texture similar to a brownie, you might enjoy looking at the technique in our Avocado Brownies in recipe.
| Method | Time | Texture | Best For |
|---|---|---|---|
| Traditional (This) | 17 mins | Light & Airy | Elegant Desserts |
| The Shortcut | 5 mins | Denser/Syrupy | Ice Cream Topping |
| The Blender | 10 mins | Thick/Custard like | Quick Cravings |
Chef's Tip: Add a pinch of espresso powder to the warm chocolate. It won't taste like coffee, but it acts like a "volume knob" for the chocolate flavor, making it taste darker and richer.
Storage Tips for Lasting Freshness
Fridge Storage: This mousse is best within the first 24 hours but will stay safe and tasty in the fridge for up to 3 days. Keep it tightly covered with plastic wrap pressed directly onto the surface to prevent a "skin" from forming.
Freezer Instructions: Believe it or not, you can freeze this! It turns into a texture similar to a semi freddo. Freeze in individual portions for up to 2 months. Thaw in the fridge for 30 minutes before eating.
Zero Waste Tip: If you have leftover mousse, use it as a dip for strawberries or swirl it into your morning oatmeal for a decadent, iron rich breakfast treat.
Elegant Ways to Present Mousse
Presentation is half the fun with a dish this simple. I love serving these in vintage coupe glasses or even small espresso cups for a concentrated "shot" of chocolate.
- The Classic: A simple dollop of extra whipped cream and a few chocolate shavings.
- The Salted Crunch: Sprinkle a few extra flakes of Maldon sea salt and some crushed toasted hazelnuts on top right before serving. The "shatter" of the nuts against the velvety mousse is incredible.
- The Berry Burst: Fresh raspberries or sliced strawberries provide a tart contrast that cuts through the richness of the 70% cocoa.
If you want a truly show stopping pairing, serve this alongside a GD Dessert Recipe setup where guests can choose their own toppings. It turns a simple bowl of mousse into a DIY dessert bar that feels much more intentional. Rich, safe, and deeply satisfying this is the recipe that proves you don't need raw eggs to reach dessert heaven.

Recipe FAQs
Is chocolate mousse safe during pregnancy?
Yes, if made correctly. Traditional mousse contains raw eggs, which carry a risk of Salmonella, but this recipe uses stabilized whipped cream instead. Always ensure any dairy component, like heavy cream, is pasteurized before use.
Does chocolate mousse have raw eggs in it?
No, this version does not. We rely on the aeration provided by stiffly whipped, cold heavy cream to create the fluffy texture, entirely bypassing the need for raw egg yolks or whites.
Can you make a healthy chocolate mousse?
Yes, by maximizing cocoa content and minimizing sugar. Using 60-70% dark chocolate provides high levels of iron and magnesium, which are beneficial nutrients.
How do I prevent the chocolate from becoming grainy when I fold it into the cream?
Temper the chocolate base first. Add a spoonful of the cold whipped cream to your slightly warm chocolate mixture and stir vigorously to bring the temperatures closer together. If you mastered this principle of temperature balancing in our [Energy Bites for recipe], you'll find this works perfectly.
Is mousse ok for pregnancy if I use gelatin for setting?
Gelatin is generally safe if it is boiled thoroughly before use. However, this recipe avoids gelatin entirely by using the hardening properties of chilled cocoa butter in high-quality dark chocolate for structure.
How long should I chill the mousse before serving?
Chill for a minimum of two hours. This allows the cocoa butter crystals to fully solidify and trap the air pockets effectively, resulting in the signature velvety set texture.
What is the best way to ensure my heavy cream whips to stiff peaks?
Use very cold cream and equipment. Chill your bowl and whisk attachments in the freezer for 15 minutes beforehand, and ensure your heavy cream is straight from the coldest part of the refrigerator.
Pregnancy Safe Chocolate Mousse
Ingredients:
Instructions:
Nutrition Facts:
| Calories | 442 kcal |
|---|---|
| Protein | 4.2 g |
| Fat | 36.2 g |
| Carbs | 24.5 g |
| Fiber | 3.8 g |
| Sugar | 17.9 g |
| Sodium | 65 mg |
