Stuffed Bell Peppers: Nutrient-Dense for Pregnancy
- Time:15 minutes active + 65 minutes cooking = Total 80 minutes
- Flavor/Texture Hook: Smoldering paprika with a bubbly, golden cheese cap
- Perfect for: Iron rich weeknight dinners or nutrient dense meal prep
- Better Stuffed Bell Peppers for Dinner
- The Secret to Soft Peppers
- Exact Recipe Specifications
- Component Analysis and Roles
- Essential Kitchen Gear
- From Prep to Plate
- Fixing Common Cooking Issues
- Troubleshooting Common Issues
- Customizing Your Meal
- Making the Recipe Your Own
- Scaling Your Batch
- Truths About Stuffed Peppers
- Storage and Waste Tips
- Serving and Plate Styling
- Recipe FAQs
- 📝 Recipe Card
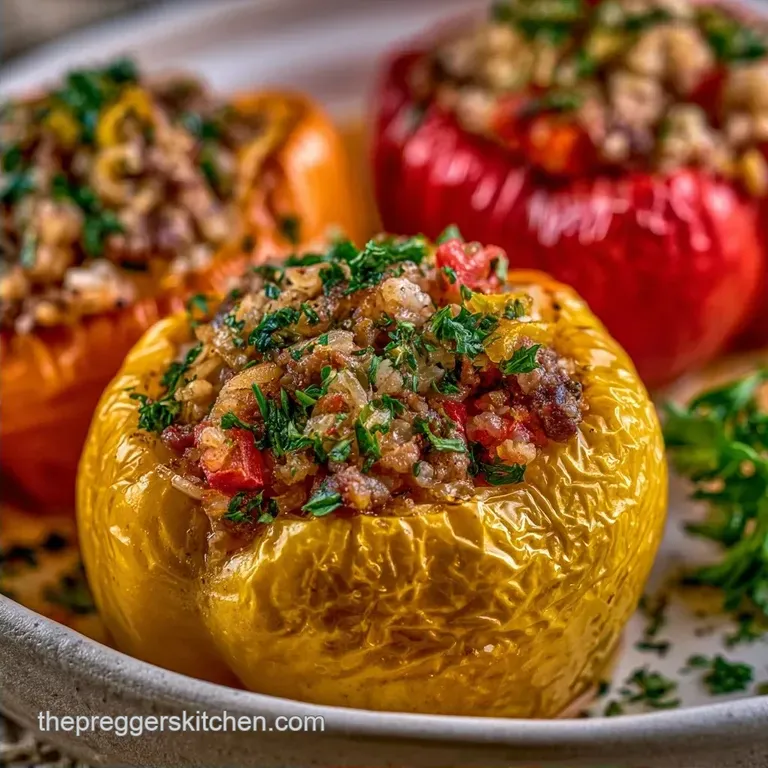
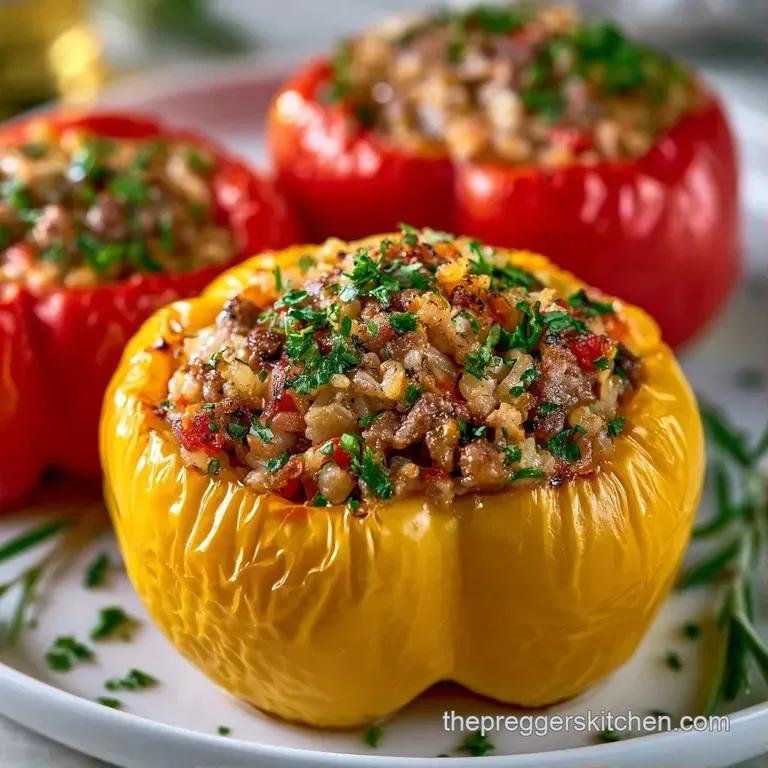
Better Stuffed Bell Peppers for Dinner
The smell of smoked paprika hitting a hot skillet is one of those scents that just feels like home. For a long time, I believed the big myth that you had to pre roast or boil your peppers before stuffing them to ensure they weren't crunchy.
I spent way too many evenings hovering over a broiler, only to have the peppers turn into mushy, collapsed shells by the time the filling was actually cooked. It was a frustrating cycle of "too hard" or "too soft."
Then I discovered the power of the steam trap method. By adding a small amount of water to the base of the pan and sealing it tight with foil, the oven becomes a steamer. This locks in the moisture and cooks the pepper from the inside out, leaving the walls tender but structurally sound.
It's the only way I make them now because it's consistent and requires way less effort.
If you're looking for Stuffed Bell Peppers that actually hold their shape and deliver a punch of flavor, this is the way. We're focusing on nutrient density here, using lean beef and brown rice to keep things nourishing.
For those managing a pregnancy, this dish is a win because it's packed with iron and folate, which are critical for fetal development. Whether you're cooking for a crowd or just prepping for the week, this method is a reliable win.
The Secret to Soft Peppers
When we talk about how this dish comes together, it's less about "magic" and more about managing moisture. Most people struggle with the texture because the filling cooks at a different rate than the pepper walls.
The Steam Chamber: The water at the bottom of the pan evaporates into steam, which is trapped by the foil. This creates a high humidity environment that breaks down the tough cellulose in the bell pepper walls without drying out the meat.
Rice Hydration Balance: Using pre cooked brown rice is a precision move. Since brown rice takes much longer to cook than a pepper takes to soften, adding it already cooked ensures the filling is velvety and cohesive rather than grainy or underdone.
The Maillard Reaction Cap: Removing the foil for the final 10-15 minutes allows direct heat to hit the cheese and the exposed tops of the peppers. This creates those charred, caramelized edges that add a smoky depth to the dish.
Protein Denaturation: Sautéing the beef and onions first ensures the meat is fully cooked and the flavors are fused before they ever hit the oven. This prevents the "boiled meat" texture that happens when you put raw filling into a pepper.
When making stuffed bell peppers while pregnant, focusing on these precision points ensures the food is safely cooked through and provides the necessary energy. You can find more healthy vegetable pregnancy recipes that use similar steaming techniques to preserve nutrients.
Exact Recipe Specifications
To get this right, you need a few specific benchmarks. If you stray too far from these, you either end up with a pepper soup or a crunchy salad.
| Method | Time | Texture | Best For |
|---|---|---|---|
| Oven (Foil) | 65 minutes | Tender & Charred | Batch cooking / Meal prep |
| Stovetop | 40 minutes | Soft & Steamed | Quick dinner / Small batch |
- 1. Temperature
- Keep the oven at exactly 350°F (175°C). Any hotter and the cheese burns before the peppers soften.
- 2. The Seal
- Use a heavy duty foil sheet. If steam escapes, your peppers will stay crunchy.
- 3. Water Level
- Exactly 1/4 cup of water in the pan. Too much and you're boiling them; too little and the steam disappears.
Component Analysis and Roles
Every ingredient here has a job, especially when we're looking at this from a maternal wellness perspective. We want iron rich and folate packed components to keep you feeling nourished.
| Ingredient | Science Role | Pro Secret |
|---|---|---|
| Bell Peppers | Structural Vessel | Brush with oil for a better sear |
| Lean Beef | Protein/Iron Source | Use 93% lean to avoid greasy filling |
| Brown Rice | Complex Carb/Binder | Use a touch of salt in the rice water |
| Crushed Tomatoes | Acid/Moisture | Adds Vitamin C to help iron absorption |
For those focusing on Bell Peppers Pregnancy needs, the variety of colors matters. Red peppers typically have more beta carotene than green ones, which is a great boost for the immune system. According to USDA FoodData, the combination of lean beef and peppers provides a concentrated source of zinc and B vitamins.
Essential Kitchen Gear
You don't need a professional kitchen, but a few specific tools make this a breeze. I usually use a standard 9x13 inch baking dish, but a cast iron skillet works if you want a more rustic feel.
A sharp chef's knife is non negotiable for leveling the bottoms of the peppers. If the peppers aren't flat, they'll tip over and spill their filling, which is a mess nobody wants. I also recommend a sturdy spoon or a potato masher for breaking up the beef in the skillet so you don't get large chunks of meat in the filling.
Finally,, grab some heavy duty aluminum foil. The cheap stuff tends to tear or leak steam, and as we've discussed, that steam is what makes the Stuffed Bell Peppers work.
From Prep to Plate
Let's crack on with the actual process. Trust me on the order of operations here, as it prevents the filling from becoming a soggy mess.
Preparing the Vessels
- Slice the tops off the 6 large bell peppers and remove the seeds and membranes. Note: This allows the heat to penetrate the core.
- Brush the exterior of the peppers with 1 tbsp olive oil. until lightly coated to prevent sticking and encourage browning.
- Slice a tiny sliver off the bottom of each pepper so they stand upright.
Building the Flavor Base
- Sauté the diced yellow onion in a skillet over medium heat. until translucent and soft.
- Add the 1 lb lean ground beef, breaking it apart with a spoon. until browned and no longer pink.
- Stir in the minced garlic for 60 seconds. until fragrant but not burnt.
Mixing the Filling
- Stir in the 2 cups cooked brown rice and 14.5 oz crushed tomatoes. Note: The tomatoes act as the sauce that keeps the beef moist.
- Mix in the oregano, smoked paprika, sea salt, and black pepper.
- Simmer the mixture on low heat for 5 minutes. until thick and glossy.
The Assembly and Roast
- Preheat your oven to 350°F (175°C).
- Pour 1/4 cup (60ml) of water into the bottom of a 9x13 inch baking dish.
- Pack the filling tightly into each pepper and stand them upright. Note: Pressing the filling prevents air pockets.
- Cover the dish tightly with foil and bake for 45 minutes.
The Final Melt
- Remove the foil carefully to avoid steam burns.
- Top each pepper with a generous portion of shredded cheddar or mozzarella.
- Bake for another 10-15 minutes. until the cheese is bubbly and pepper skins show slight charred edges.
- Garnish with fresh parsley and let them rest for 5 minutes before serving.
Fixing Common Cooking Issues
Even with a plan, things can go sideways. Usually, it comes down to moisture or stability.
Troubleshooting Common Issues
| Issue | Solution |
|---|---|
| Why Your Peppers are still too crunchy | This almost always happens because the steam escaped. If the foil wasn't crimped tightly around the edges of the pan, the humidity drops, and the peppers won't soften. |
| Why the filling is too dry | If the filling feels grainy or dry, you might have overcooked the beef during the sauté phase or used rice that was too dry. |
| Why the peppers are tipping over | This is a prep issue. Peppers are naturally curved. If you don't slice a tiny, flat base into the bottom, they will lean and eventually fall. |
- ✓ Level the bottom of the peppers
- ✓ Ensure a tight foil seal
- ✓ Don't overfill to the very brim
- ✓ Use lean beef to avoid oil pools
Customizing Your Meal
The beauty of Stuffed Bell Peppers is how adaptable they are. Depending on where you are in your pregnancy, your nutritional needs and cravings might change.
Stuffed Bell Peppers Pregnancy First Trimester
During the first trimester, nausea can be a real struggle. If the smell of cooking meat is too much, try using a mild turkey breast or even extra firm tofu. You can also add more ginger to the onion sauté to help soothe the stomach. Keep the portions small but nutrient dense.
Stuffed Bell Peppers Pregnancy Second Trimester
This is often the "golden era" where appetite returns. You can load up on the brown rice and add extra veggies like diced carrots or zucchini into the filling. This is a great time to experiment with different cheeses, like a sharp provolone, to keep things interesting.
Stuffed Bell Peppers Pregnancy Third Trimester
As you hit the third trimester, heartburn becomes more common. To keep this recipe friendly, reduce the amount of garlic and smoked paprika. You might also swap the sharp cheddar for a milder mozzarella to avoid triggering acid reflux.
The Plant Based Swap
For a vegetarian version, swap the beef for a mix of cooked lentils and quinoa. This remains a high protein option and pairs wonderfully with the tomato base. If you're craving something heartier, a spinach lentil pregnancy dinner is another great way to get those greens in.
The Low Carb Alternative
If you're watching your carbs, swap the brown rice for cauliflower rice. Note that cauliflower rice releases more water, so you should simmer the filling for an extra 3-5 minutes to thicken it up before stuffing the peppers.
Making the Recipe Your Own
Since we're talking about substitutions, you don't have to stick to the script if you're missing an ingredient. Just be mindful of how it changes the outcome.
| Original Ingredient | Substitute | Why It Works |
|---|---|---|
| Lean Ground Beef | Ground Turkey | Similar protein. Note: Milder flavor, slightly drier |
| Brown Rice | Quinoa | Higher protein. Note: Nuttier taste and fluffier texture |
| Sharp Cheddar | Mozzarella | Great melt. Note: Much milder flavor |
| Crushed Tomatoes | Tomato Puree | Similar acidity. Note: Thicker consistency, less chunky |
Wait, what about the rice? If you're in a rush, you can use frozen pre cooked rice. Just make sure it's thawed and warmed slightly before adding it to the skillet. This keeps the filling from cooling down too quickly.
If you want a more "Mediterranean" vibe, swap the paprika for dried basil and use feta cheese on top. This version feels lighter and is great for those warmer months when a heavy beef dish feels like too much.
Scaling Your Batch
Cooking for one or for ten requires a bit of a strategy shift. You can't just multiply everything linearly and expect the same results.
Scaling Down (2-3 Peppers): Use a smaller baking dish, like an 8x8 square pan. Because there is less mass in the oven, the heat penetrates faster. Reduce the covered bake time by about 20% (try 35 minutes instead of 45).
If you're using a single egg as a binder in a variation, beat it first and use half.
Scaling Up (12+ Peppers): When doubling the recipe, don't double the salt and paprika. Start with 1.5x the spices and taste as you go. Use two 9x13 pans rather than one giant roasting pan to ensure the heat distributes evenly.
For the liquids, reduce the total water in the pans by 10% to avoid turning the bottom into a soup.
If you're baking a double batch, I recommend lowering the temperature to 325°F (160°C) and extending the cook time by 10-15 minutes. This ensures the peppers in the center of the oven get just as tender as the ones on the edges.
Truths About Stuffed Peppers
There are a few things people always say about this dish that just aren't true. Let's clear the air.
Myth: You must use red peppers for sweetness. Actually, any color works. Green peppers are more "grassy" and bitter, which actually cuts through the richness of the beef and cheese better than red ones do. It's all about the flavor profile you prefer.
Myth: Lean beef makes the dish dry. Not if you use the tomato simmer method. The crushed tomatoes create a sauce that clings to the lean meat, providing all the moisture you need without the excess grease that pools at the bottom of the pan when using 80/20 beef.
Myth: Brown rice is too hard to cook in this dish. The myth is that you should cook the rice inside the pepper. This is a mistake. Raw brown rice takes far longer to cook than the pepper takes to soften. Always use pre cooked rice to ensure a velvety texture.
Storage and Waste Tips
These are some of the best leftovers because the flavors actually deepen after a day in the fridge.
Fridge Storage: Store your Stuffed Bell Peppers in an airtight container for up to 4 days. To reheat, I recommend a splash of water in the container and a cover, then microwaving for 2-3 minutes. This recreates that steam effect and stops the beef from drying out.
Freezer Guidelines: You can freeze these for up to 2 months. I suggest freezing them before adding the cheese. Wrap each pepper individually in foil and place them in a freezer bag.
When you're ready to eat, bake them from frozen at 350°F, adding about 15 minutes to the covered time, then add the cheese at the end.
Zero Waste Ideas: Don't throw away the pepper tops! You can chop them up and throw them into a mirepoix for a soup. If you have leftover filling, it makes a fantastic base for a skillet hash the next morning. Just fry it up with a few eggs on top. This is a great way to reuse leftovers alongside other nourishing meals, like a Broccoli and Cheese Soup for a cozy lunch.
Serving and Plate Styling
Presentation makes a difference, especially when you've put in the effort to get the texture right. Since the peppers are colorful, keep the rest of the plate simple.
Start by placing two peppers in the center of a wide bowl. This keeps any residual sauce from the bottom of the pan contained. Spoon a little bit of that pan juice over the top to add a glossy finish.
The fresh parsley garnish isn't just for looks, it adds a bright, herbal note that cuts through the richness of the cheddar.
For a complete meal, serve these with a side of steamed spinach or a light cucumber salad. The acidity of a vinaigrette pairs perfectly with the smoky, cheesy profile of the peppers. If you're serving guests, a drizzle of Greek yogurt or a dollop of sour cream on top adds a velvety contrast to the charred edges.
Right then, you've got a precision engineered plan for the best Stuffed Bell Peppers you've ever made. Just remember the foil seal, the pre cooked rice, and the 350°F temperature. Trust me, once you stop pre roasting your peppers and start using the steam trap method, you'll never go back.
Happy cooking!
Recipe FAQs
Can I eat cooked bell peppers while pregnant?
Yes, they are safe and nutritious. If you are adjusting your diet during pregnancy, you can pair these with other pregnancy safe substitutes to keep meals exciting.
Is there egg in these stuffed peppers?
No, this recipe is egg-free. The filling remains stable and cohesive thanks to the thick consistency of the crushed tomatoes and cooked brown rice.
How to prevent the peppers from tipping over in the pan?
Slice a tiny, flat base into the bottom of each pepper. This creates a level foundation so they stand upright during the 45-minute baking process.
Why are my bell peppers still crunchy after baking?
This occurs when steam escapes the baking dish. Make sure the foil is crimped tightly around the edges of the pan to trap the humidity needed to soften the pepper skins.
How to reheat leftovers without the beef drying out?
Add a splash of water to the container before microwaving. Cover the dish and heat for 2-3 minutes to recreate the steam effect.
What should I do if the filling is too dry?
Avoid overcooking the ground beef during the sauté phase. Ensure your cooked brown rice is moist and simmer the mixture until it is thick and glossy before stuffing.
Is it true that I must use a 9x13 inch pan for this recipe?
No, this is a common misconception. While a 9x13 inch dish is suggested, any baking pan that fits the peppers snugly and allows for a tight foil seal will work.
Nutrient Dense Stuffed Bell Peppers

