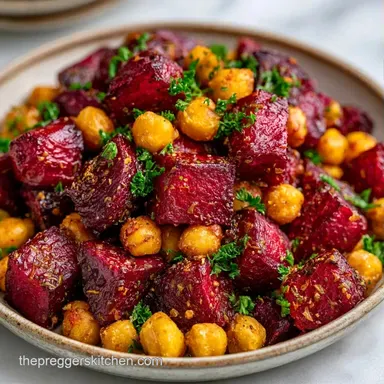
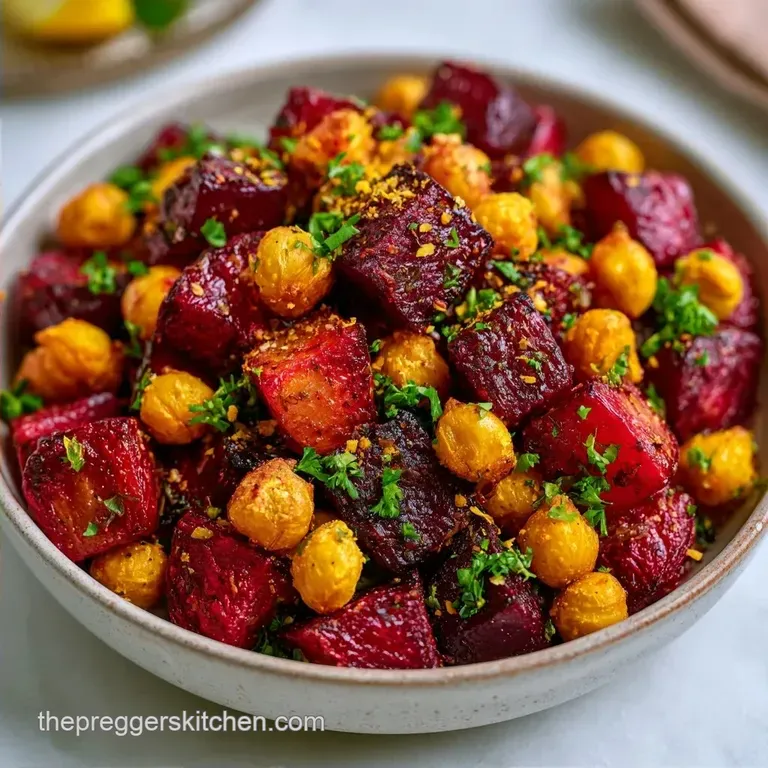
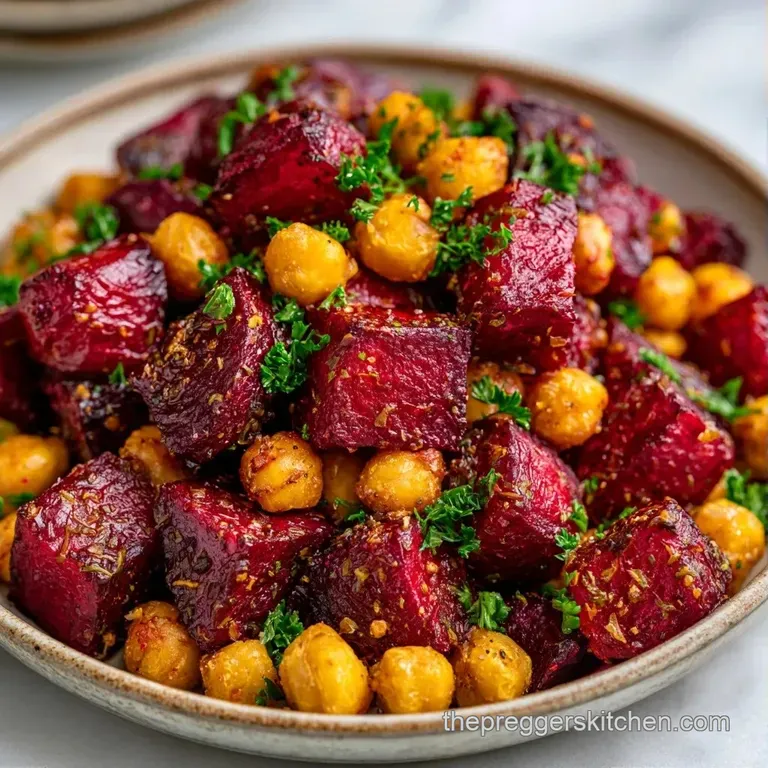
Iron Nourish Bowl with Roasted Beets
- Time: 15 min active + 30 min cook
- Flavor/Texture Hook: Earthy roasted beets with a nutty, zesty crunch
- Perfect for: Nutrient dense meal prep or fighting afternoon fatigue
- How to Make an Iron Nourish Bowl
- Ingredient Role Breakdown
- The Complete Shopping List
- Essential Kitchen Tools
- Putting The Bowl Together
- Fixing Common Bowl Issues
- Troubleshooting Common Issues
- Fresh Variations and Swaps
- Myths About Plant Based Iron
- Storage and Waste Tips
- Best Pairings and Sides
- Recipe FAQs
- 📝 Recipe Card
The smell of roasting beets is something else, that deep, earthy aroma that fills the kitchen. But let's be honest, most nourish bowls end up as a soggy, depressing pile of greens and cold grains by the time you actually eat them.
I've had too many bowls where the dressing turns the kale into slime and the chickpeas are just... there.
If you're dealing with low energy or looking for Iron Rich Pregnancy Recipes, you need a meal that feels substantial, not like a chore to chew. This is where the Iron Nourish Bowl comes in. It's designed to avoid that mushy texture by roasting the heavy hitters at a high heat and using a dressing that actually helps with nutrient absorption.
We're focusing on "non heme" iron here, which is the kind found in plants. It's a bit more stubborn than the iron in meat, but we've got a few tricks to make it work for us. This bowl is all about balance, mixing the warmth of the oven with the snap of fresh carrots.
How to Make an Iron Nourish Bowl
The goal here isn't just to throw things in a bowl, but to maximize the nutritional punch. According to the NIH Office of Dietary Supplements, Vitamin C significantly increases the absorption of non heme iron. That's why the lemon juice in our dressing isn't just for flavor, it's a functional part of the recipe.
Why This Bowl Works
- Citrus Synergy: The lemon juice in the tahini dressing converts iron into a form that's easier for your gut to absorb.
- over High heat Roasting: Cooking beets and chickpeas at 200°C creates a structural crust, which prevents them from getting soggy when the dressing hits.
- Grain Foundation: Quinoa provides a complete protein base that keeps you full longer than plain lettuce.
Right then, before we get into the gear, let's look at how this version compares to the usual "shortcut" bowls you see online.
| Feature | Fresh Roasted Method | Pre Cooked Shortcut | Impact |
|---|---|---|---|
| Texture | Crispy chickpeas, tender beets | Soft/Mushy grains | Better mouthfeel |
| Iron Bioavailability | High (fresh lemon/tahini) | Moderate (bottled dressing) | Better absorption |
| Flavor | Deep, caramelized notes | Bland, uniform taste | Richer profile |
Using fresh ingredients might take a few more minutes of prep, but the difference in how you feel after eating it is huge.
Ingredient Role Breakdown
I like to think of every ingredient as having a specific job. If you swap something out, you need to know what job it was doing so you can find a replacement that does the same thing.
| Ingredient | What It Does | Best Swap |
|---|---|---|
| Beetroot | Primary iron source & earthiness | Sweet potato (less iron, more beta carotene) |
| Tahini | Creamy base & healthy fats | Almond butter (similar profile, slightly sweeter) |
| Quinoa | Protein rich, gluten-free grain | Brown rice (more fiber, less protein) |
| Lemon Juice | Vitamin C for iron absorption | Lime juice (similar acidity and C content) |
The pumpkin seeds and almonds add a critical layer of zinc and magnesium, which work alongside the iron to support overall energy levels.
The Complete Shopping List
Grab these items from the store. I recommend getting organic kale if you can, as it often has a milder taste.
- 1 lb (450g) beetroot, peeled and diced into ½ inch cubes Why this? Dense source of nitrates and iron
- 1 can (15 oz / 425g) chickpeas, drained, rinsed, and patted dry Why this? Adds plant protein and texture
- 2 tbsp extra virgin olive oil
- ½ tsp sea salt
- ¼ tsp cracked black pepper
- 1 tsp smoked paprika Why this? Adds a woody depth to the beets
- 1 cup (170g) uncooked quinoa, rinsed thoroughly
- 2 cups baby kale or spinach, stems removed
- ¼ cup pumpkin seeds, toasted Why this? High in magnesium
- 2 tbsp sliced almonds
- 1 medium carrot, shaved into ribbons
- 3 tbsp tahini Why this? Rich in calcium and healthy fats
- 2 tbsp fresh lemon juice
- 1 tbsp maple syrup
- 1 clove garlic, minced
- 3 tbsp warm water
Essential Kitchen Tools
You don't need a professional kitchen for this, but a few specific tools make the process much smoother.
- Large Baking Sheet: Use one with a rim so the olive oil doesn't drip into your oven.
- Fine Mesh Strainer: Essential for rinsing quinoa to remove the bitter saponins.
- Small Whisk: A mini whisk is better for the tahini dressing to get it smooth.
- Vegetable Peeler: Used for creating those thin carrot ribbons.
Putting The Bowl Together
Let's get into it. The key is timing everything so the quinoa is fluffed just as the beets come out of the oven.
Phase 1: The over High heat Roast
- Preheat your oven to 400°F (200°C).
- On a baking sheet, toss the diced beetroot and dried chickpeas with olive oil, salt, pepper, and smoked paprika. Note: Ensure chickpeas are very dry to get a crust.
- Spread everything in a single layer.
- Roast for 25-30 minutes, tossing halfway through, until beets are tender and chickpeas have a browned crust.
Phase 2: The Grain Foundation
- Combine the rinsed quinoa and 2 cups of water in a saucepan.
- Bring to a boil, then reduce heat to low, cover, and simmer for 15 minutes.
- Remove quinoa from heat and let it sit, covered, for 5 minutes until the water is fully absorbed and grains look translucent.
- Fluff gently with a fork.
Phase 3: The Emulsion
- Whisk together the tahini, lemon juice, maple syrup, minced garlic, and warm water.
- Stir until the dressing is silky and pourable. Note: If it's too thick, add warm water one teaspoon at a time.
Phase 4: The Assembly
- Layer the fluffed quinoa at the bottom of the bowl.
- Add the roasted beetroot and chickpeas on top.
- Top with baby kale, carrot ribbons, toasted pumpkin seeds, and sliced almonds.
- Drizzle the Vitamin C iron boost dressing over the top and serve immediately.
Chef's Note: If you're prepping this for the week, keep the dressing in a separate jar. Only drizzle it on right before you eat, or the kale will wilt in about an hour.
Fixing Common Bowl Issues
Even with a plan, things can go sideways. The most common issue with an Iron Nourish Bowl is the texture either the chickpeas aren't crunchy or the dressing separates.
Troubleshooting Common Issues
| Issue | Solution |
|---|---|
| Why are my chickpeas not crunchy | This usually happens because of excess moisture. If you don't pat the canned chickpeas completely dry with a paper towel, they steam instead of roast. They'll be soft rather than crisp. |
| Why did my tahini dressing seize or clump | Tahini can be temperamental. When you add lemon juice, it sometimes "seizes" and becomes a thick paste. The trick is using warm water and whisking vigorously to bring it back to a smooth state. |
| Stop the beetroot from staining | Beets are basically nature's dye. To keep your bowl looking clean, add the beets as the very last roasted component and keep the greens slightly separated. |
Fresh Variations and Swaps
This Iron Nourish Bowl is a great canvas. You can tweak it based on what's in your fridge or your specific dietary needs.
Decision Shortcut:
- If you want more protein, add 100g of grilled tempeh or chickpeas.
- If you want more sweetness, swap the carrots for roasted pears.
- If you want a different base, use farro or wild rice.
For those who want a different meal style entirely, maybe a warm sandwich, my Grilled Caprese Sandwich is a great way to get your greens in a different format.
Is this safe for Iron Rich Pregnancy Recipes?
Yes, this recipe is very safe and highly recommended. It avoids raw sprouts or unpasteurized cheeses, focusing instead on folate and iron. Just ensure your quinoa is rinsed well to remove saponins, which can occasionally irritate sensitive stomachs.
Can I add meat for more iron?
Absolutely. Adding sliced steak or grilled chicken can bump up the iron content. An Iron Rich Chicken Nourish Bowl is a great way to transition from plant based to animal based iron.
Myths About Plant Based Iron
There are a few things people get wrong about "healthy" bowls. Let's clear those up.
Myth 1: All iron is the same. Actually, heme iron (meat) is absorbed much more easily than non heme iron (plants). That's why the lemon juice in this recipe is mandatory, not optional. It bridges that gap.
Myth 2: You can't get enough iron from a bowl. With the combination of beetroot, chickpeas, quinoa, and seeds, this Iron Nourish Bowl provides a massive chunk of your daily requirement. The key is the synergy of ingredients.
Storage and Waste Tips
To keep things fresh, store the components separately. The roasted beets and chickpeas stay good in the fridge for 4 days in an airtight container. The cooked quinoa also lasts 4 days.
For the dressing, keep it in a small glass jar. If the tahini settles, just give it a good shake.
Zero Waste Tips:
- Beet Greens: Don't throw away the beet leaves! Sauté them with a bit of garlic and olive oil; they are just as nutrient dense as the root.
- Carrot Tops: Blend carrot greens into a pesto with some of the tahini and lemon juice.
- Quinoa Water: If you have leftover rinsed quinoa water, it's great for watering acid loving plants.
Best Pairings and Sides
While the Iron Nourish Bowl is a full meal, sometimes you want a bit more on the table. Because this bowl is earthy and zesty, it pairs well with something crusty or slightly sweet.
A side of Homemade French Bread is a great way to soak up the extra tahini dressing left at the bottom of the bowl. If you're serving this for a brunch, a few slices of fresh apple or pear provide a sweetness that cuts through the earthiness of the beets.
Trust me on this: the combination of the warm grains and the cold, shaved carrots is what makes this recipe work. It's not just about the nutrients, it's about the experience of eating something that feels alive and nourishing. Let's crack on and get roasting.
Recipe FAQs
Are nourish bowls healthy?
Yes, they are nutrient dense powerhouses. By combining whole grains, legumes, and fresh vegetables, they provide a balanced ratio of fiber, vitamins, and minerals in one meal.
What are some beet root recipes for iron deficient anemia?
Combine roasted beets with quinoa and chickpeas. Pairing these iron rich plants with the Vitamin C in lemon juice helps your body absorb the iron more efficiently.
How to make the roasted chickpeas crunchy?
Pat the canned chickpeas completely dry with a paper towel before roasting. Excess moisture causes them to steam rather than develop a crisp crust at 400°F.
Is it true that tahini dressing never clumps when mixing?
No, this is a common misconception. Tahini often seizes into a thick paste when lemon juice is added, but whisking in warm water restores the smooth consistency.
What should pregnant women cook to increase iron intake?
Focus on meals containing baby kale, pumpkin seeds, and legumes. These nutrients are also key ingredients in a vegetarian pregnancy salad for balanced daily nutrition.
How to store this bowl for meal prep?
Store the roasted beets, chickpeas, and cooked quinoa in separate airtight containers. Keep the tahini dressing in a small glass jar and shake well before drizzling over the components.
How to get tender beets without overcooking the chickpeas?
Roast both at 400°F for 25-30 minutes. Toss them halfway through the roasting time to ensure the beets soften evenly while the chickpeas crisp up.
Iron Nourish Bowl